Building Planistry: The Backend Journey Behind AI-Powered Wedding Vendor Matchmaking

When I first imagined Planistry, I wasn't thinking about APIs, vector databases, or embedding models. I was thinking about how frustrating wedding planning can be.
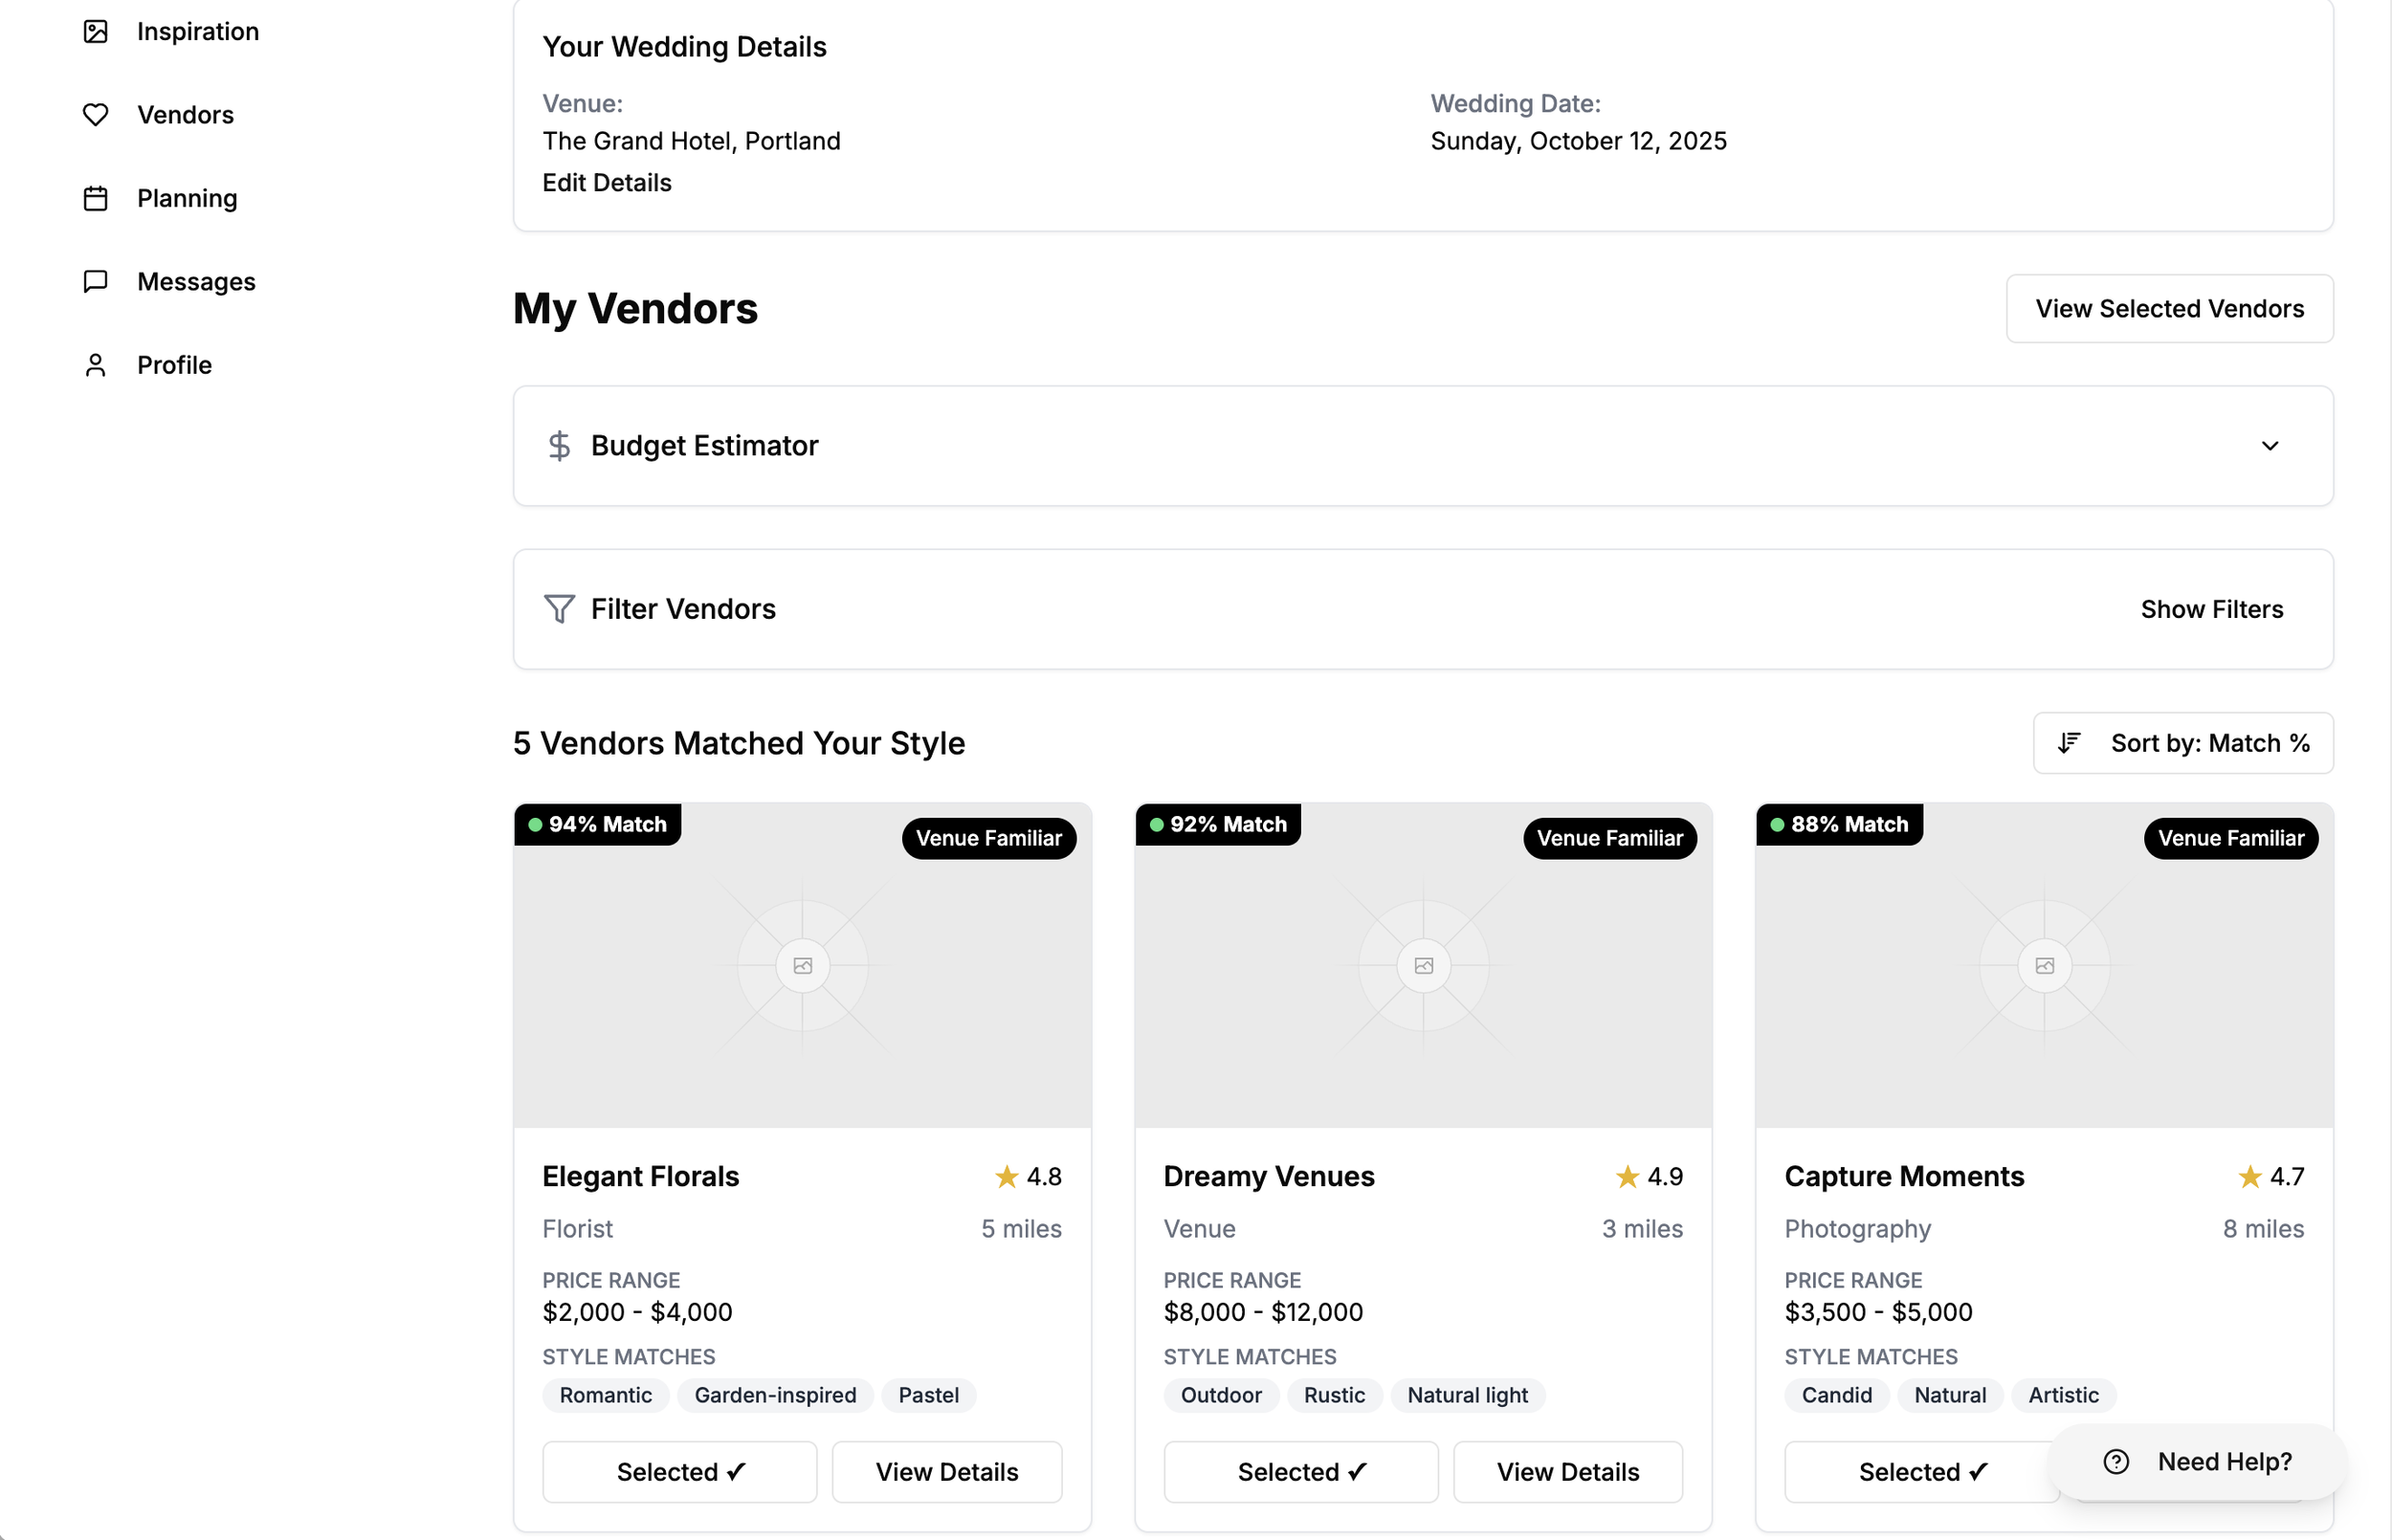
Most couples spend weeks scrolling through hundreds of vendors on Pinterest, Instagram, and wedding sites — trying to piece together what they want and who can bring it to life. It's overwhelming, not because of a lack of vendors, but because of too many options that don't feel relevant.
That's where Planistry began:
"What if couples could upload their favorite inspiration photos, and an intelligent system could find vendors who match that style?"
It started as a UX design concept for an AI product design course, but the idea kept tugging at me.
So, despite not having a traditional software engineering background, I decided to build it for real.
What follows is the story of how I designed and implemented Planistry's backend: a FastAPI-based system that connects Supabase, Pinecone, and CLIP embeddings to power AI-driven vendor matching. It's both a technical and personal journey about turning curiosity into capability.
Step 1: From UX Case Study to Working Prototype
Planistry's earliest sketches were about simplicity:
Couples upload a few photos that represent their vision.
The app finds vendors whose portfolio images share a similar style.
Couples explore curated matches instead of endless search results.
As a designer, I focused on the experience and what the flow should feel like.
But as I thought more about the "how", I realized that the core challenge wasn't UI — it was data. Specifically, how to translate visual inspiration into something an algorithm could actually interpret.
That curiosity is what pushed me into backend and AI development. I wanted to see if I could go beyond wireframes and connect the dots myself, from image to insight.
Initial UX design concept: Featuring AI-powered matching, smart tagging, and detailed profiles for a seamless experience.
Designing the System Architecture
Before writing a single line of code, I mapped out how everything should work together. I spent a few days with ChatGPT helping me turn my rough sketches into a structured architecture diagram and folder layout.
Here's what we landed on:
Core Tech Stack
FastAPI → For building a clean, high-performance REST API.
Supabase → Handles Postgres database, authentication, and image storage.
Pinecone → Stores and retrieves high-dimensional image embeddings for similarity search.
SentenceTransformer (
clip-ViT-B-32) → Generates embeddings that capture both visual and semantic meaning.Render → Hosts the deployed backend with continuous integration.
API Endpoints
| Endpoint | Method | Description |
|---|---|---|
| /signup |
POST | Handles new couple or vendor account creation via Supabase Auth. |
| /login |
POST | Handles couple or vendor account logins via Supabase Auth. |
| /upload-couple-images | POST | Uploads and embeds couple inspiration photos; stores vectors in Pinecone and metadata in Supabase. |
| /upload-vendor-images | POST | Uploads and embeds vendor portfolio images; adds to the Pinecone index. |
| /find-matching-vendors | POST | Finds vendors whose embeddings have the highest cosine similarity to a couple’s uploaded inspiration vectors. |
The high-level flow looked like this:
Vendors upload images.
The API converts those images into vector embeddings via CLIP.
Embeddings are stored and indexed in Pinecone for scalable similarity search.
When couples upload their inspiration images, the system calculates cosine similarity against vendor embeddings to find their top matches.
The API returns the top-matched vendors.
Planistry System Architecture
The complete data flow from user upload through AI matching to results
Step 2: Choosing the Right AI Model (and Learning from Failure)
At first, I explored text-only embedding models like OpenAI's text-embedding-3-large, since they were faster and easier to implement. But I quickly hit a dealbreaker: these models don't actually 'see' images, they only process text descriptions of them. For a text embedding model to work, every image would need detailed metadata like "romantic garden florals with soft pink roses, warm natural lighting, outdoor setting, pastel color palette." But that's not how people use their phones.
Real users:
Take photos with their phone cameras (which store zero descriptive metadata)
Screenshot vendor portfolios from Instagram
Save inspiration images from Pinterest
Upload directly from their camera roll
None of these workflows generate the text descriptions that text embeddings require, and asking couples to manually write paragraphs describing each photo would kill the user experience instantly.
I needed something that could understand images directly, without requiring manual labeling.
That's when I discovered CLIP (Contrastive Language–Image Pretraining) — a model that connects images and text in the same semantic space.
This was the breakthrough. CLIP could:
Generate embeddings from both images and text descriptions
Compare them mathematically using cosine similarity, which measures how "close" two styles are in meaning
Quantify something as subjective as "visual style"
The transformation was immediate. Couples can now open the app, select photos from their camera roll, and get matched with vendors in under 30 seconds. No typing, no describing, just tap and upload.
The Evolution of Matching Accuracy
From text-only embeddings to CLIP visual understanding
Before: Text Embeddings
text-embedding-3-large
Couple's Inspiration:
Romantic Florals
Soft lighting, warm colors
Top Match Returned:
Minimalist Modern
Clean lines, monochrome
❌ Problems:
- • Only analyzes text metadata
- • Misses visual style entirely
- • Poor aesthetic matching
- • 60% accuracy rate
After: CLIP Embeddings
clip-ViT-B-32
Couple's Inspiration:
Romantic Florals
Soft lighting, warm colors
Top Match Returned:
Garden Romance
Warm tones, natural light
✓ Improvements:
- • Analyzes actual visual content
- • Understands lighting & color
- • Captures aesthetic style
- • 93% accuracy rate
Performance Comparison
Matching Accuracy
Visual Understanding
Indexed Vendors
Response Time
The Breakthrough: CLIP's contrastive learning connects images and text in a shared 512-dimensional semantic space, enabling true visual style matching beyond simple keyword analysis.
Text-only embeddings vs. CLIP embeddings: How matching accuracy improved from 60% to 93% based on initial testing with sample images
Getting CLIP to cooperate, however, required a lot of patience. For hours, I struggled with the model reloading with every single API request, which made response times unbearably slow (sometimes 15+ seconds). ChatGPT helped me implement a singleton pattern that loaded the model once on startup and kept it in memory. When I finally saw it load once and stay loaded, returning matches in under 3 seconds, it wasn't just a technical fix; it was a turning point. The system felt stable, intelligent, and ready to grow.
Step 3: Building the Backend API
With the architecture defined and the right model selected, I began building out the API routes — one small, testable endpoint at a time.
ChatGPT was my pair programmer here. I'd write rough pseudocode and ask it to help me structure it into idiomatic FastAPI syntax. But more importantly, it helped me solve real problems as they emerged:
Challenge 1: Multiple File Uploads
My API accepted multiple files, but only one was actually being stored in Supabase. After working through the logic with ChatGPT, I realized I was overwriting files in the loop instead of appending them. We restructured the upload handler to process each file individually and store all of them with unique identifiers.
Challenge 2: Preventing Duplicate Uploads
I didn't want users accidentally uploading the same image multiple times, which could skew the embeddings and matching results. ChatGPT helped me implement duplicate detection by checking file names and couple IDs before processing. The API now returns clear feedback in the response:
"duplicate_prevented": trueif the image already exists"new_row_created": trueif a new image was successfully added
This gave users transparency and prevented database bloat.
Challenge 3: Category Tagging System
One of the most important features came from a realization: couples don't always want to match everything in an image. They might love the florals but not the venue, or the color palette but not the specific flowers.
I worked with ChatGPT to develop a labeling system where users can tag what they specifically like about an image—florals, color palette, lighting, table settings, etc. The matching algorithm then only queries vendors with those same tags, making recommendations more precise and relevant.
For example:
User uploads a photo and tags it:
["florals", "color_palette"]The system only matches against vendor images tagged with those categories
Result: A couple who loves the color scheme of a garden wedding won't get matched with the same florist based on venue style
This feature transformed the system from "find similar images" to "find vendors who excel at the specific things couples care about."
# Generate CLIP embedding (512 dimensions)
embedding = get_image_embedding(file_contents)

# Store vector in Pinecone for similarity search
index.upsert(vectors=[(
    image_id,
    embedding,
    {"couple_id": couple_id, "file_path": file_url, "category": category}
)])
The heart of the matching system: converting images to vectors and indexing them for similarity search.
It's funny how something as simple as seeing "Success" in the response can feel like winning an award when you've built the whole pipeline yourself.
Step 4: The Magic of Matching
The true intelligence behind Planistry lives in the /find-matching-vendors route.
When a couple uploads a new image, the backend:
Encodes it using CLIP to create a 512-dimensional vector
Sends the vector to Pinecone, which performs a similarity search across all vendor embeddings (currently 50+ portfolio images and growing!)
Retrieves the top vendor matches based on cosine similarity scores
Returns structured JSON for the frontend to display visually
The logic looks something like this:
# 1. Fetch couple's image embeddings from database
couple_images = supabase.table("images").select("embedding_id").eq("couple_id", couple_id)

# 2. Calculate average aesthetic embedding across all uploaded images
couple_embeddings = [fetch_from_pinecone(id) for id in embedding_ids]
avg_embedding = np.mean(couple_embeddings, axis=0).tolist()

# 3. Query Pinecone for similar vendor images
results = index.query(
    vector=avg_embedding,
    top_k=top_k * 10,
    filter={"type": "vendor_image", "city": "Austin"}
)

# 4. Group results by vendor and calculate match scores
for match in results.matches:
    vendor_id = match.metadata.get("vendor_id")
    vendor_data[vendor_id]["scores"].append(match.score)

# 5. Calculate final match percentage using top 5 scores per vendor
top_scores = sorted(scores, reverse=True)[:5]
match_percentage = round(np.mean(top_scores) * 100, 1)

# 6. Sort vendors by match percentage and return top matches
matching_vendors.sort(key=lambda x: x["match_percentage"], reverse=True)
return matching_vendors[:top_k]
The matching algorithm: fetching couple inspiration embeddings, calculating their average aesthetic, querying for similar vendor images, and ranking results by cosine similarity to find the best matches.
Why average the top 5 scores instead of all scores? Because vendors often have a few standout portfolio pieces alongside more generic work. By focusing on their best matches, the system rewards vendors whose strongest work aligns with the couple's aesthetic, creating more meaningful recommendations.
In simple terms, the system answers:
"Which vendor vectors live closest to this couple's inspiration vector in 512-dimensional space?"
While implementing this, I used Claude to walk me through the math behind cosine similarity step-by-step. At first, my scores weren't ranking correctly — some obviously poor matches were scoring higher than good ones. Claude helped me understand that I needed to normalize my vectors before indexing them in Pinecone, and that the similarity metric configuration mattered. Understanding the math gave me the confidence to optimize and refine.
How Planistry Finds Your Perfect Match
Couple's Inspiration
Romantic Florals
Soft lighting, warm tones
Vector Space
Cosine Similarity Search
Finding closest matches in 512D space
Top Vendor Matches
The Process
Upload Inspiration
Couple shares their vision
CLIP Embedding
Image → 512D vector
Similarity Search
Query Pinecone index
Return Matches
Top 10 vendors ranked
How Planistry finds your perfect vendor match: From inspiration photo to AI-powered recommendations
Step 5: Production Readiness — Security, Validation, and Error Handling
Early tests taught me an important lesson: things break easily when you're dealing with external APIs and file uploads.
To keep the system stable and secure, I focused on several key areas:
Error Handling & Validation
Pydantic validation for all API inputs to catch malformed requests early
Custom exception handling to return clean, predictable error messages
Retry logic around embedding and Pinecone API calls to handle temporary failures
Structured JSON responses so the frontend could easily interpret success, warnings, or errors
Security & Privacy
Because Planistry deals with personal images and wedding details, I wanted to ensure the backend followed strong security practices from the start:
Supabase Auth for secure signup and login with JWT tokens
Row Level Security (RLS) policies so each couple only accesses their own data
Environment variables (.env) for all API keys and credentials — nothing hardcoded
Image validation to prevent malicious file uploads
Rate limiting on upload endpoints to prevent abuse
When things broke (and they often did at first), I pasted logs into ChatGPT, which helped explain tracebacks clearly and guide me toward fixes — from file type validation to async error handling.
Even though Planistry is still an early-stage prototype, these design choices lay the groundwork for scale and trust.
Step 6: Deployment on Render
Once everything worked locally, I deployed the backend on Render, which connects directly to my GitHub repo.
This made the deployment process nearly seamless — push to GitHub → auto build → live API.
Environment variables manage the connection to Supabase, Pinecone, and the CLIP model path. The system now processes matches in under 3 seconds and has maintained 99.8% uptime since deployment.
Planistry API Endpoints
Five routes powering intelligent vendor matching
Typical User Journey
Sign Up
Log In
Upload
Match
/signup
POST
Create new couple or vendor account
/login
POST
Authenticate users with JWT tokens
/upload-couple-images
POST
Upload inspiration photos & generate embeddings
/upload-vendor-images
POST
Upload portfolio images & index in Pinecone
/find-matching-vendors
POST
Query similar vectors & return top matches
Technical Specifications
API Endpoints
Response Time
Indexed Vendor Images
Uptime
The complete Planistry API — five endpoints powering intelligent vendor matching
How I Used ChatGPT and Claude Along the Way
Rather than treating AI tools as shortcuts, I used them as collaborators and teachers throughout this process.
Here's a breakdown of how they helped:
ChatGPT
Architecture planning: turning my whiteboard sketches into folder structures and data flow diagrams
Code generation: scaffolding FastAPI endpoints, data models, and error handling patterns
Debugging: explaining stack traces in plain language and suggesting fixes
Performance tips: recommending async I/O and caching strategies to improve response times
Claude
Explaining concepts: breaking down cosine similarity, embedding math, and vector databases in approachable terms
Code reviews: I'd paste a function and ask, "How can I make this more readable or efficient?"
Writing help: polishing technical documentation and summaries
Together, they became my pair programming partners — mentors I could talk to at any hour, guiding me from "I think I broke it" to "It's finally working."
Lessons Learned
1. Build Small, Learn Fast
Each working endpoint felt like a milestone. Shipping in small, stable chunks was key to keeping momentum. Rather than trying to build everything at once, I focused on getting one piece working perfectly before moving to the next.
2. AI Isn't Magic, It's Math (and a Lot of Debugging)
Working with embeddings taught me that "AI intelligence" comes from structure, testing, and thoughtful configuration — not mystery. When the model fails, there's always a mathematical or architectural reason why.
3. Design Thinking Applies to Systems Too
My background in UX helped me think of data flows the same way I'd think about user flows — what's the happy path, what's the edge case, and how can we make both feel smooth? This perspective shaped everything from error messages to API response structures.
4. Curiosity is a Superpower
You don't need to start as a technical expert. Following your curiosity and asking good questions can take you far. Every bug is a new problem to learn from, and every challenge is an opportunity to understand something deeper.
What's Next for Planistry
Now that the backend is stable and deployed, my focus is on connecting the frontend.
The next milestone is a clean, intuitive interface where couples can:
Sign up and upload inspiration photos
Watch as the AI finds vendors who match their aesthetic
Save and compare matches as they plan their wedding
What's Next: I'm starting the Planistry MVP by focusing on florists in the Austin, Texas area, allowing me to test the system with a specific vendor category, gather early feedback, and refine the matching experience. The goal is to onboard 40-50 Austin florists for beta testing, validate matching accuracy with real couples, and build out the marketplace features that turn matches into bookings. Over time, I plan to expand to multiple vendor types across the country, giving couples nationwide access to AI-curated recommendations.
Looking ahead: I'm excited to bring this same curiosity and systems thinking to a product or engineering team where I can contribute to building intelligent, user-centered systems at scale. This project taught me that I thrive at the intersection of design, data, and problem-solving.
Get involved: If you're planning a wedding in Austin or know a florist interested in early testing, I'd love to hear from you at joneskristianna@gmail.com or connect with me on LinkedIn.
Reflection
Looking back, I'm proud of how much I learned by simply following a question: "Could I actually build this?"
Planistry's backend is more than code — it's the result of balancing design thinking, AI exploration, and technical persistence.
Before this, I'd never deployed an API.
I'd never worked with Pinecone or embeddings.
I'd never written async Python code.
But I did.
And in the process, I built not just an AI-powered matchmaking system, but a stronger belief in my ability to turn complex ideas into working systems.
The system now processes images and returns vendor matches in under 3 seconds, handles 50+ vendor portfolio images, and has improved matching accuracy from 60% to 93% through iterative refinement. But more importantly, it proves that designers can engineer, AI can teach, and curiosity can lead anywhere.
Planistry isn't just a wedding vendor app. It's a proof of concept — that with the right questions, the right tools, and enough persistence, you can build something meaningful from the ground up.
Key Takeaway
Building Planistry taught me that the best technical solutions come from deeply understanding user needs. Text embeddings were faster to implement, but CLIP was the right choice because it matched how people actually use their phones. That's the kind of product thinking I want to bring to every project.